HOW TO EQ VOCALS?
Every vocal engineer and producer has to find the sweet spot between rawness and smoothness in order to mix a vocal properly. Beginners need to know that this is actually a very challenging process. Mixing vocals isn’t different from mixing an instrument because it requires the same skills and abilities to do things properly: EQ, compression, reverb & delays. But there are some important tips you could use while EQing vocals for better outcomes while mixing.
***Use these tips as a starting point when you mix your vocals and take further decisions according to your vocals as each vocal recording is different.
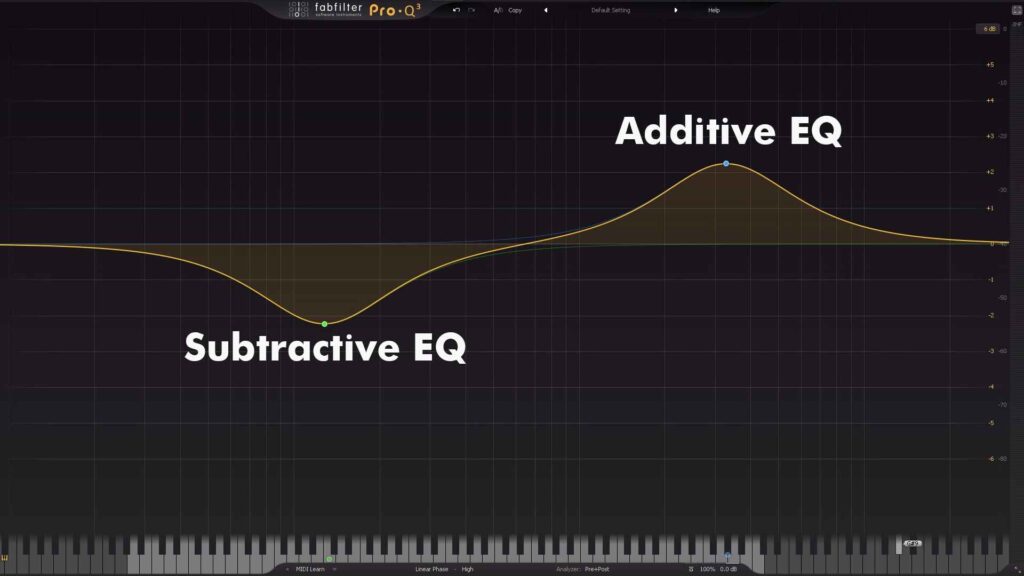
Subtractive Eq
Subtractive eq is all about finding and reducing or removing the problem frequencies in the vocals. Say you have a vocal recording that sounds boomy or you have a vocal that is sounding harsh, piercing your ears, you need to do Subtractive EQ to fix the common issues with the vocals that I will explain in this blog.
Additive Eq
When it comes to additive eq, you would normally do it when you have to add fullness, presence, clarity and air to the vocals. But be careful that overdoing additive eq will ruin the vocals and make them muddy and harsh.
PROBLEM AREAS/FREQUENCIES IN VOCALS
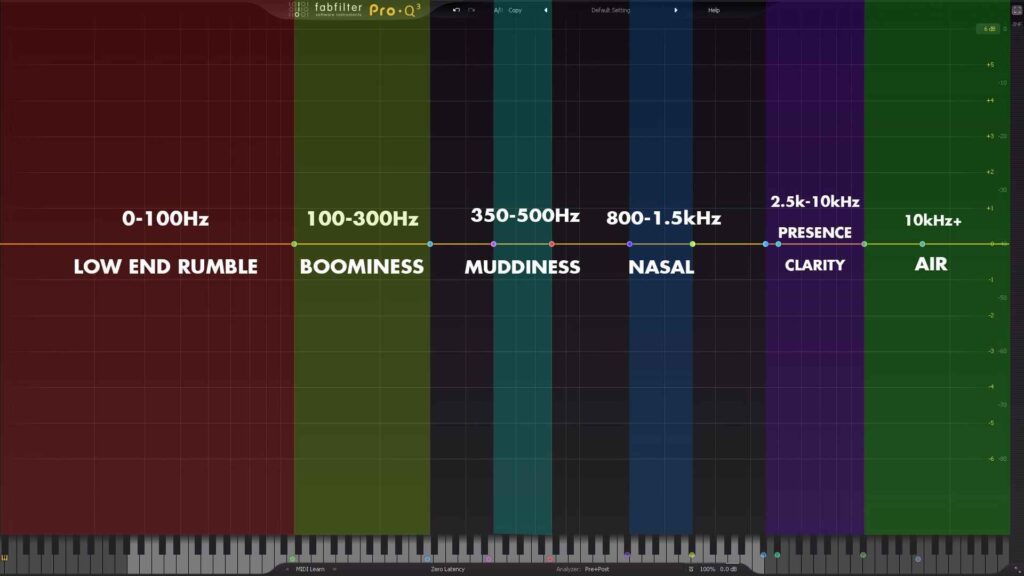
1. 0Hz – 100Hz: Low-End Rumble
A lot of the sounds in this frequency range are meant to be cut by a high pass eq. Sounds like vibrations, mic stand handling noise, air conditioning noise etc which would only clutter and make your mix dirty. So it is essential to cut everything below 80Hz. Be cautious, because overdoing it makes your vocals sound thin. Always be mindful and double-check what you are doing with the eq band.
2. 100Hz to 300Hz: Boominess
You wouldn’t have to boost within this frequency range most of the time as there is potentially a lot of boominess present in the vocal in this range. Try a 2-3 dB cut within this range according to your vocal. Don’t go overboard with the cut to keep the fullness intact
***Sometimes if your vocal is sounding thin, you can do a little boost to check whether it adds fullness to the vocal.
3. 350Hz to 500Hz: Muddiness and Boxiness
Use a narrow Q factor to sweep through this frequency range and do precise cuts on the problem frequencies. Fabfilter Pro- Q3 has a great feature to listen precisely and then cut the frequency that is sticking out. Don’t rush and lower it down until there’s no more mud.
***Overdoing it will make the vocals sound hollow.
4. 800Hz to 1.5kHz: Nasal and Honkiness
Vocals sound honky and nasally within this frequency range. Use a narrow Q factor on your eq band and cut to reduce the problem.
***If you want to increase the intelligibility of your lyrics you can give a little boost in this frequency range depending on your vocal.
5. 2.5kHz to 4.5kHz: Presence
This is not a problem area but if you want to add energy and definition to your vocals, try a little boost right around 3kHz.
Be careful that you don’t boost too much to avoid making the vocals sound painful to listen to.
To soften the vocals, try a narrow cut within 2.5kHz – 4kHz.
6. 5kHz – 10kHz: Clarity
Do a gentle boost with a wider Q in this range to add extra presence and clarity to dull vocals.
This range has sibilance too which I will explain in the De-Esser Section.
7. 10kHz to 16kHz: Air
A high shelf boost above 10kHz will give the vocals more air. Do only if you need it though.
DE-ESSER
De-Esser is just like a compressor but it works only on the specific frequency range where the sibilance is present. It allows you to isolate the sibilant frequency range and turns it down when it gets louder. It makes the vocal tone smoother.
Sibilance often lies within the 5-9 kHz frequency range. For male vocals, it is often around 5-6kHz and with female vocals, you’ll find it around the 7-8kHz range. This is not always necessary that you’ll find it in the exact spot but use these frequency ranges as a starting point and listen for the “S’s” and “T’s”
Best Eq Plugins (Free and Paid)
Free
Paid
Best De-Essers (Free and Paid)
Free
Paid
CONCLUSION
These are just starting points because each vocal sounds completely different, but, it is a great way for you to get started with the vocal eq and fix the problems if any.
Remember that it is best to attenuate than to boost, and when it is necessary to boost it is best to use a wider Q and boost a small quantity of dB.
Always check your vocals in the context of the mix only then you’ll arrive at the best-sounding vocal. Hope you got some knowledge about how to eq vocals. If you have a song that you need mixed and mastered professionally, you can hire me.
Wish you all the best!